What’s New?
TurtleThread has been designed to follow the syntax of Python Turtle, so the transition should be relatively seamless! However, to deal with the intricacies of embroidery, there are a few things you will have to take note of.
Stitch types
In Python Turtle, a simple turtle.forward(100) will create a line.
However, in the world of embroidery, it is important to specify the type of stitch.
TurtleThread has numerous stitches implemented, listed in the API documentation.
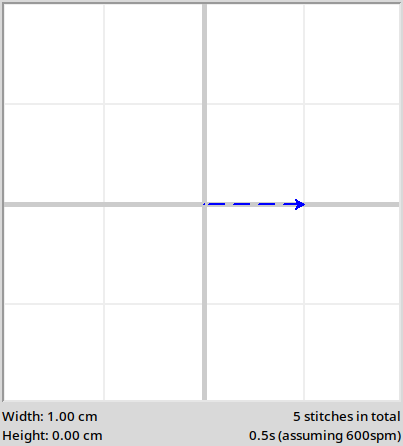
As a simple example, let’s use a Running Stitch. This is a common stitch that, when used in a straight line, will create stitches at a constant distance apart.
1from turtlethread import Turtle
2
3turtle = Turtle() # Use the TurtleThread Turtle
4
5with turtle.running_stitch(25):
6    turtle.forward(100)
7
Notice the use of the with turtle.running_stitch(...) on line 4. This is known as a context manager, allowing
us to easily segment our code into different sections with different stitches.
Alternatively, you may use the turtle.start_running_stitch(...) and turtle.cleanup_stitch_type() methods.
1turtle.start_running_stitch(25)
2turtle.forward(100)
3turtle.cleanup_stitch_type() # Always clean up before using another stitch type!
Pen Up/Down
In Turtle, the turtle.penup() and turtle.pendown() functions are used to move from one part of the canvas to
another without tracing its movement.
In embroidery, the way to do this is called a Jump Stitch. When using a jump stitch, the embroidery machine moves to the specified location without leaving any stitches.
1with turtle.jump_stitch():
2    turtle.forward(100)
3
4# Alternatively, to close follow Turtle syntax...
5turtle.start_jump_stitch() # Instead of turtle.penup()
6turtle.forward(100)
7turtle.cleanup_stitch_type() # Instead of turtle.pendown()
However, it is strongly advised to limit the number of jump stitches in your embroidery pattern. This is because during embroidery, the embroidery machine has to temporarily pause embroidery and cut the thread, resulting in significant delays to the embroidery process.
Exporting for Embroidery
The key purpose of TurtleThread is to allow for designs to be embroidered into reality. As such, knowing how to prepare files for embroidery is essential.
Firstly, ensure that you call the turtle.visualise() or turtle.fast_visualise() function. From the bottom of the interface, the estimated time
for how long the pattern will take to embroider is displayed, as well as the number of stitches if you wish to
calculate the time needed for your embroidery machine.
There will also be warnings if the stitches are too dense. If the warning for stitch density appears, do not proceed with embroidery. The pattern may jam your machine and potentially break it.
Next, use the turtle.save() function to export the pattern to a file format that your embroidery machine supports.
The list of supported file formats is found in
PyEmbroidery’s README.
A brief example is given below.
 1from turtlethread import Turtle
 2
 3turtle = Turtle()
 4
 5with turtle.running_stitch(25):
 6    for i in range(3):
 7        turtle.forward(100)
 8        turtle.right(120)
 9
10turtle.visualise() # Check through the visualisation. You may omit this if you know what you are doing to save time.
11turtle.save("triangle.exp") # Replace 'triangle.exp' with any file name and file format.